If you’re looking to add some character to your floors without the cost and commitment of new flooring, then stenciling could be the perfect solution for you. Floor stencils are a creative way to add patterns and designs to your floors and breathe new life into your home. However, you may wonder how long they last and what kind of paint works the best. We’ll cover some essential questions you need to know before starting a floor stenciling project. Read on to learn about the dos and don’ts of floor stenciling, the types of paint to use, how to clean stenciled floors, and more!
Do Floor Stencils Last?
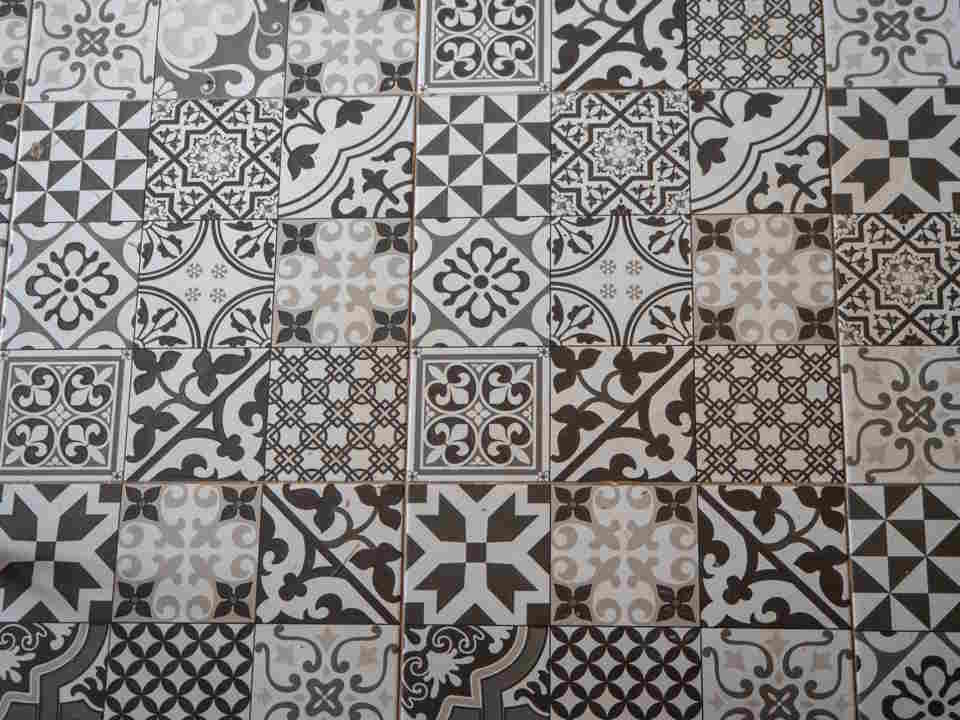
Are you tired of your boring plain floors but don’t want to go through the hassle and expense of completely replacing them? One solution that has gained popularity in recent years is floor stenciling. With stencils, you can add unique designs and patterns to your floors without breaking the bank. However, a common question that arises is: do floor stencils last?
The answer to this question largely depends on the quality of the materials used and the amount of foot traffic your floors receive. In general, high-quality stencils and durable paints can last for years with proper upkeep. However, if you opt for cheaper stencils or use low-quality paint, you may find that the design begins to fade or peel within a few months.
To ensure that your floor stencils last as long as possible, it’s important to:
- Choose high-quality stencils: Look for stencils made from thick, durable materials that will hold up over time.
- Use durable paint: Opt for paints that are specifically designed for floors or high-traffic areas. Avoid using regular wall paint, as it may not hold up to the wear and tear of foot traffic.
- Seal the design: Once you’ve stenciled your floors, apply a clear sealant to protect the design from scratches and scuffs. This will help prevent the paint from chipping or peeling over time.
While floor stenciling can be a great way to add a unique touch to your home decor, it’s important to set realistic expectations in terms of longevity. By choosing high-quality materials and taking proper care of your stenciled floors, you can enjoy your design for years to come.
What Kind of Paint Do You Use for Floor Stencils?
When it comes to floor stenciling, one of the most common questions people have is what kind of paint to use. Choosing the right paint is crucial as it can impact both the appearance and durability of the final result.
The most commonly recommended paint type for floor stenciling is porch and floor paint. This type of paint is specifically designed for high traffic areas and is durable enough to withstand foot traffic, scuffing, and even moisture. Porch and floor paints typically come in a satin or semi-gloss finish, which helps to reduce sheen and hide imperfections.
- Another option for floor stenciling is chalked paint. This type of paint is a popular choice for furniture makeovers but is also suitable for floors. It dries to a matte finish, giving the floor a shabby chic or vintage look. With chalked paint, you can create a rustic, farmhouse-style floor without breaking the bank.
- Another benefit of using chalked paint is that it doesn’t require a primer or sanding, making it a quicker and easier option.
An important thing to keep in mind when choosing paint for floor stenciling is to look for a formula that is low in VOCs (volatile organic compounds). VOCs are chemicals that can be harmful to the environment and human health. Low VOC paints have been formulated to reduce emissions and have less of an odor than traditional paints.
When it comes to selecting paint for floor stenciling, porch and floor paint and chalked paint are two popular options. Porch and floor paint is the more durable and long-lasting option, and chalked paint is a more budget-friendly option that is easier to use but may require a sealant for high traffic areas. Choose the paint that meets your specific needs and style preference, and stencil away!
How Do You Stencil a Floor?
Stenciling is an amazing way to give your floors a new look. It’s a budget-friendly, DIY project that can change the entire ambience of your home. Are you tired of seeing the same boring tile or wooden floor you have had for years? Why not give it a new life with stenciling? With the right tools and methods, you can easily stencil your floor. Here’s a guide on how to do it.
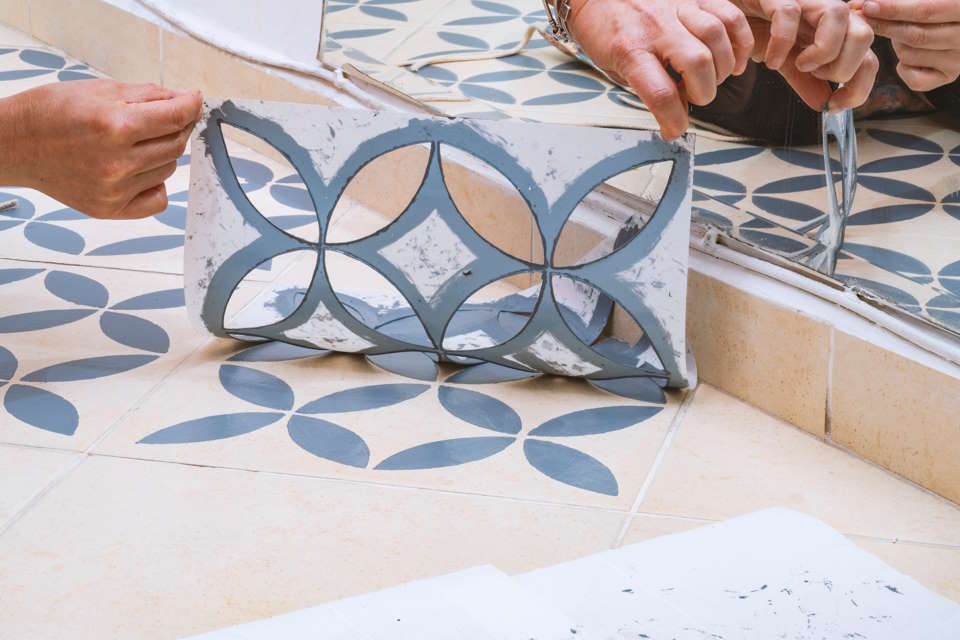
Firstly, choose the stencil design and paint color scheme you want. There are a variety of stencil designs and paint colors available in the market. You can select from a wide range of styles, from traditional to modern and bold to subtle. Consider the theme of your home decor and choose accordingly. Once you have selected the design, measure your floor and order a stencil in the appropriate size. You can also create your custom stencils if you prefer.
- Next, clean your floor properly. Stenciling should be done on clean and dry surfaces. Remove any dirt, dust, or debris from the floor. Use a vacuum and mop to get rid of any remaining dirt.
- Prepare the floor for stenciling by applying a base coat. Use a paint roller or brush to apply a base coat of paint to the entire floor. Allow the paint to dry completely before you begin stenciling.
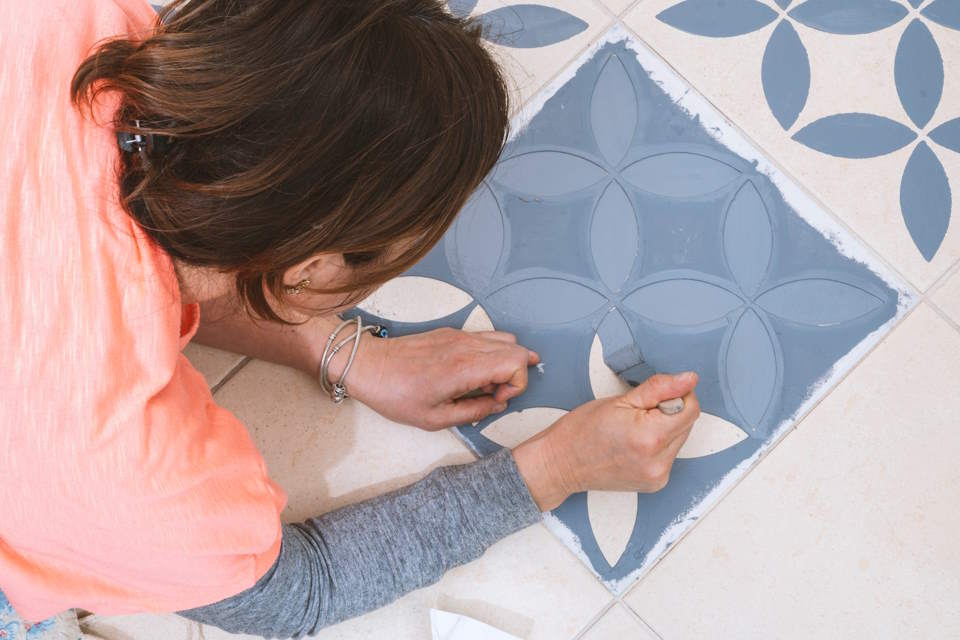
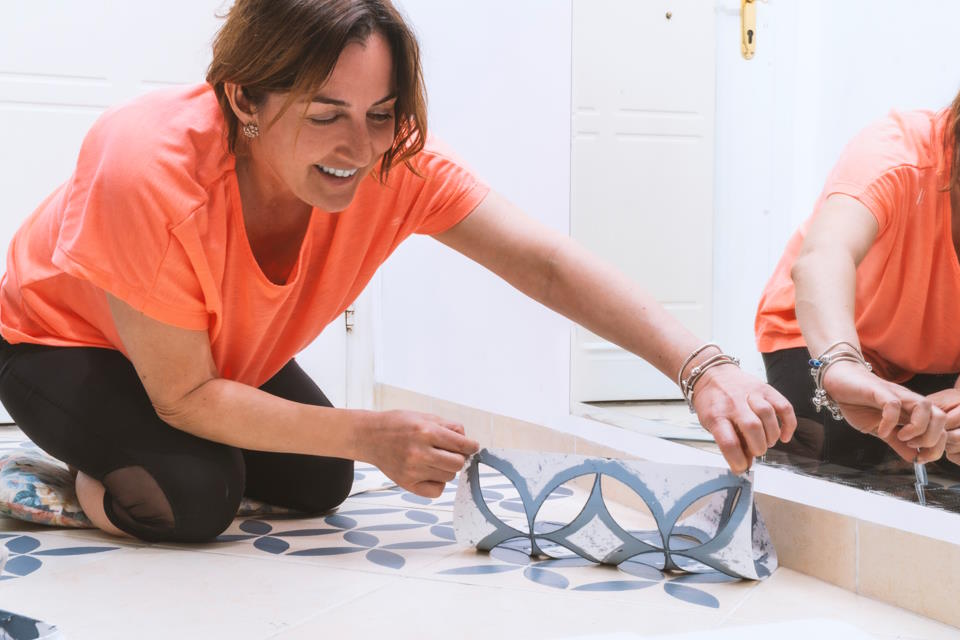
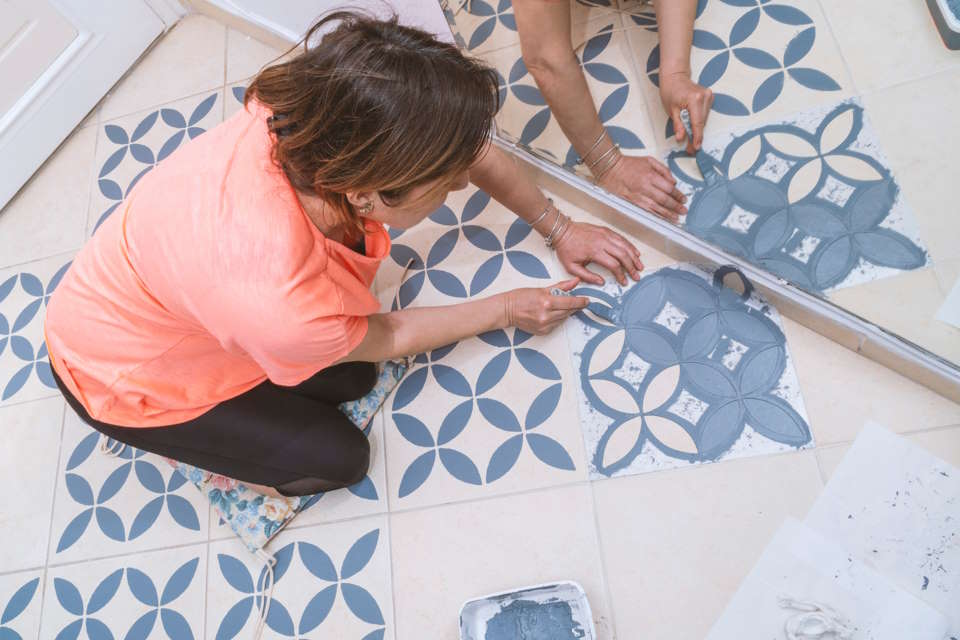
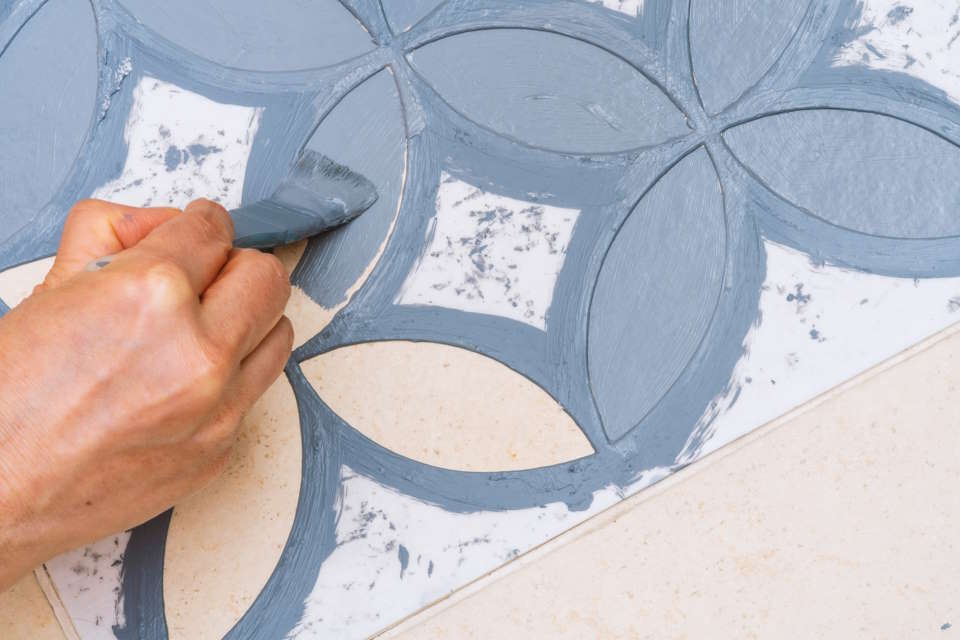
- Now, it’s time to start stenciling. Position the stencil on the floor where you want to stencil the design. Use painter’s tape to secure the stencil in place. Make sure the stencil is flat and there are no air bubbles. Use a stencil brush or roller to apply paint to the stencil. Apply the paint evenly and do not overload the brush.
You will need to reposition the stencil and repeat the process until the entire floor is stenciled. Be patient and let the paint dry completely between each stencil application. Use a damp towel or rag to clean the stencil between each use to avoid smudging. Once the paint is dry, allow it to cure according to the manufacturer’s instructions before walking on it.
Finally, add a sealant to protect your stenciled floor. A sealant is important to protect the paint from wear, tear, and spills. Choose a clear sealant that is compatible with the paint you’ve used for stenciling. Use a paint roller or brush to apply the sealant in light coats. Allow it to dry completely before walking on it.
That’s it! You have stenciled your floor and have given your home a new look. Stenciling can be time-consuming, but it’s also fun and rewarding. Follow these simple steps, and you can easily stencil your floor.
Can You Stencil Laminate Flooring?
If you’re looking to give your laminate flooring a new look, stenciling can be a great way to do so. But can you actually stencil laminate flooring? The answer is yes! However, there are a few things you should keep in mind to ensure that your stenciling project turns out successful.
First and foremost, prepare your laminate flooring properly before beginning the stenciling process. This means cleaning it thoroughly and allowing it to dry completely. Any dirt or debris left on the floor can cause issues when you try to stencil, such as causing the paint to bleed or not adhere properly to the surface.
- Next, choose a stencil that is suitable for use on laminate flooring.
- It’s recommended to use adhesive stencils instead of regular ones, as they will stick to the laminate surface better.
- You can also try creating your own stencil using contact paper or vinyl.
When it comes to the paint you use for stenciling laminate flooring, it’s important to choose one that is durable and won’t easily scratch or peel off. Consider using a paint that is specifically designed for high traffic areas, such as a porch and floor paint. You can also seal the paint with a clear top coat to ensure added durability.
Now that you have your stencil and paint ready, you can begin the actual stenciling process. Make sure to place the stencil in the desired location on the laminate flooring, and use painter’s tape to secure it in place. Then, apply the paint to the stencil using a foam roller or brush, being careful not to apply too much pressure and cause the paint to bleed.
Overall, stenciling can be a great way to give your laminate flooring a new look. By following the proper steps and taking the time to prepare and execute the project carefully, you can achieve a successful and long-lasting outcome that you can enjoy for years to come.
What Are the Disadvantages of Stenciling?
Stenciling floors can be a genius way to add your own unique style to a space. It’s affordable, easy to do, and gives you amazing results. But like any DIY project, there are advantages and disadvantages when it comes to stenciling. We’ll be discussing the disadvantages of stenciling and what you should be careful about.
One of the major disadvantages of stenciling is that it can be time-consuming. Depending on the size of the space you’re working on, the repetitive process of stenciling can take up a lot of your time. Sometimes the stencil patterns can also be complicated and require focus, which can wear you out or strain your eyes.
Another disadvantage of stenciling is that it can be difficult to achieve a consistent result. Even if you carefully follow the instructions for stenciling a floor, there’s always a chance that you might miss a spot, or not have an even paint distribution. This can result in an uneven and unpolished appearance which might not match the vision you had in mind.
- One other disadvantage of stenciling is that it requires a little bit of maintenance. Unlike regular floors, stenciled floors might need a little more care to maintain their appearance. Depending on the type of stencil and paint you use, cleaning the floor might require you to avoid harsh chemicals or scrubbing roughly.
- Stenciling your floors can be a great way to customize your home but it’s not devoid of disadvantages. By keeping some of the negative points in mind and proper maintenance, however, you can avoid some of the hiccups that come along with the stenciling process..
What Is the Difference Between Vinyl and Stencil?
When it comes to home décor and DIY projects, stencil and vinyl are two popular options for adding designs to floors and walls. Many people often confuse these two or use the terms interchangeably, but they are quite different. Understanding the difference between them will help you choose the best option for your specific project needs.
Stencil: Stenciling is a technique that involves using a cut-out template or paper stencil to apply paint onto a surface. Stencils are usually made of thin plastic or cardboard and are available in a variety of designs, sizes, and shapes. To use a stencil, you simply place it on the surface, secure it in place, and apply paint with a roller or brush. Stenciling is a great way to add patterns, textures, and designs to walls, floors, and furniture.
Vinyl: Vinyl is a type of adhesive-backed material that is used to create custom designs on various surfaces. It is made of high-quality, durable vinyl and is available in a wide range of colors, patterns, and finishes. Vinyl is often used for wall decals, murals, and decals on cars and laptops. It is also an excellent option for adding designs to floors as it can withstand high traffic and is easy to clean and maintain.
Choosing between stencil and vinyl depends on various factors, including the design, surface, and type of project. For example, if you want to add a custom design to a car or laptop, vinyl is the way to go. If you want to add patterns and designs to your walls or floors, stenciling may be a better option. Consider your project needs, budget, and skill level to decide between the two.
How Do You Clean Stenciled Floors?
Incorporating stencils to your flooring is a simple way to add some pattern and panache into your otherwise dull and boring floor. They are easy to apply and can give a fresh new look to your living space without breaking the bank. But just like any flooring, stenciled floors require cleaning and maintenance to maintain their charm.
Regular Sweeping and Dusting
The first and foremost step towards achieving a clean stenciled floor is to regularly dust and sweep it. Dust and dirt can accumulate over time, making your floor look dingy and unattractive. Use a microfiber mop or broom to sweep your flooring, focusing on any corners and crevices where dirt tends to accumulate. For stubborn dirt, use a brush to scrub at the affected areas.
Choose the Right Cleaning Products
Stenciled floors should only be cleaned with gentle cleaning products. Make sure to choose the right cleaning solution that won’t damage the finish of the flooring. Avoid abrasive cleaning agents, such as scouring pads and hard-bristled brushes; these can scratch the surface and damage the stencil. Instead, use a pH-neutral cleaning solution and a soft cloth to maintain your floors’ quality and pattern.
Wipe Spills Immediately
One of the most crucial things you can do to maintain your floors’ quality is to act fast when spills occur. Spills that are left unattended to can seep into the floor’s porous surface, causing permanent damage to the stencil. Make a habit of wiping spills immediately to maintain your floors looking neat and fresh.
Keeping your stenciled floor looking clean and hygienic is easy, as long as you follow the right steps and use the appropriate cleaning products. Regular sweeping and dusting, coupled with prompt action on spills, are the keys to achieving a gleaming and attractive floor. Aside from keeping it clean, stenciled floors require little maintenance and can last for years when taken care of properly.